Sunday, 12 September 2010

Onion Tart.


i really fancied making an onion tart but the internet provided little in the way of appetising recipes - plenty for onion quiche, but i wanted something significantly less eggy. finally i found and modified a recipe which suggested double cream. win!

ingredients
one large white onion
one large red onion
one 200ml tub double cream
one tsp honey
salt, pepper, thyme, worcester sauce & butter

---------------

(also, plain flour, butter, milk, water, salt and pepper for the pastry; or you can buy ready made. homemade pastry is super easy and wonderful tasting and i love making pastry and dough SO MUCH; i probably make it at least once a week for something.

i tend to guess at measurements, but 5 heaped tablespoons of flour and 4 knive-fulls of butter will about do it, then sprinkles of salt and pepper, and rub the butter in til the mixture is like breadcrumbs. add a splash of milk and stir together with a spoon, then add water til the dough forms a ball. if it's too sticky, add more flour. knead on a floured counter for a few minutes, then roll out to desired size and thickness. EASY. it doesn't need to be cooked through before the filling is put in either! and if you grease up the tin with plenty of butter, the tart should come out really easily.)

---------------

slice the onions into thin slices. add a large knob of butter to a frying pan, warm up then throw in the onions. after a minute, turn the heat right down and leave them to simmer away, stirring every minute or so.

make your pastry (or roll it out and line your tin if you're using pre-made); preheat the oven to a medium heat.

when the onions and browned and super soft, add salt, pepper, thyme and a little worcester sauce to taste, and stir in a teaspoon of honey.
tip around 2/3 of the double cream into the pan and let it thicken slightly.
add the mixture to the tart, and stick it in the oven until the pastry is brown and the top is bubbling.

i also grated some cheese on top about 5 minutes before the end, and served with green beans, parsnip and mushroom that had been fried in honey and mustard. gorgeous - the cream hadn't quite set, which was perfect because the dish wasn't too dry.


i have 2 pieces left, which i'm gonna serve with mash, green beans and rosemary and mint gravy tonight, and salad with honey mustard dressing tomorrow.

--------------

i had a little pastry left over, so before i added the cream i plonked 3 little spoon fulls onto the rolled out scraps and made 3 little snack-sized onion pastry parcels - just an idea for leftovers!

Friday, 3 September 2010

Product: Garlic Card

this thing is genius; and i can't understand how it actually works, but work it does.
i give you the garlic card.


i bought it in the design museum when i was in london... (but you can buy it on amazon - it comes in a range of colours; i got red cos i have red chopsticks, also from the design museum. i see a theme developing here.)

...and basically, it purees garlic.


and you think "well that doesn't look like much!", but then you swipe the puree off the card with your finger, and into a pan/into a bowl and it looks like quite a lot of puree, AND THEN your meal is remarkably garlic-y.

i mixed it with pepper, oregano and soya butter.....


...then spread it on some bread and grilled. garlic bread! (perfectly garlic-y!)


served with fry-veg soup...?
i read this recipe on some site the other day and tried to recreate it from memory since i didn't bookmark it...

one large tomato, cut into chunks
one medium onion, cut into chunks
one large mushroom (or a few smaller ones), sliced

fry in olive oil until brown
add stock, mixed into a cup of warm water
add half a tin of chopped tomatoes
flavour with salt, pepper, basil, oregano and worcester sauce, and a squirt of ketchup if you are a fan of the sweet taste

put a lid on the frying pan and simmer until the sauce thickens (10-15 mins).
serve with crusty bread - or garlic bread!

a hearty but small tea or a great lunch dish!


NB: i also topped mine with thinly sliced goats cheese and pepper.

great tip!
in order to melt the cheese and keep the dish
warm while the bread finishes off browning, put
the pan lid on top of the bowl for a minute or two!

Sunday, 29 August 2010

Salmon Balls.


salmon balls.
does what it says on the tin.
much like meatballs, but considerably more fishy and pink.

you will need
one small tin of salmon
plain flour
butter
salt, pepper and thyme

drain the salmon and mash it with a fork, in a bowl with the herbs. add some flour and shape small handfuls of the mixture into ball shapes.
heat up some butter in a frying pan.
drop the balls into the butter.

add to pasta - here i added sliced mushrooms, broccoli and spinach to the salmon balls, and then chucked in some cooked pasta with a cream cheese&milk sauce. add some worcester sauce for flavour and flour to thicken if necessary, then grate some cheese on top. et voila.

Friday, 13 August 2010

Tortillas.

decided on a whim that i'd like a wrap for tea the other night, but had no change on me to pop to the corner shop for tortilla wraps. a quick google told me i had all the ingredients and so i set about making em from scratch!
scroll down for tortilla recipes and some filling suggestions inc. one veggie/vegan option...

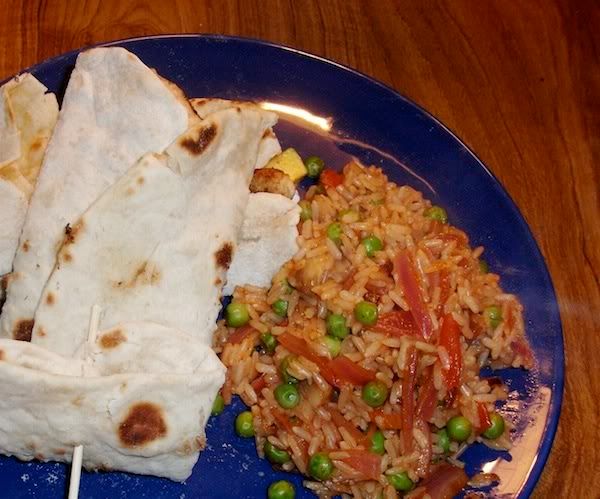
chicken & avocado tortillas with spicy rice

tortillas
this is really still in trial and error phase - i've made them on two occasions, both producing great tortillas, but of different sizes and amounts of tortillas. as such, this will, i think, make 2 decent sized tortillas (about 10 inches across, but very unlikely to be circular!)

4 heaped tablespoons plain flour
large dash of salt
1 tablespoon olive oil
warmed up milk (add as necessary)
pepper (optional)

you can also add other herbs/spices/flavourings as desired, but these make great plain tortillas!

---------

add flour, salt, pepper and olive oil to a bowl and stir together with a spoon. gradually add the milk (i heated a little through in the microwave) and stir or whisk 'til you have a slightly sticky dough. turn it out onto a floured surface and knead, knead, knead for a few minutes - it should take the stickiness out of the dough! split the ball into smaller balls (one for each tortilla) and leave to rest in the fridge for about half an hour.

heat a little olive oil in a non-stick frying pan.
flour up a rolling pin and a bench and roll out your tortilla - they should be as thin as possible, and you're trying to get them round (but mine were either square or wonky; no matter). you can also pick them up and let gravity do it's thing if they're thin enough! whack them in your pan for about a minute on each side (they should crisp up a bit and, well, look like tortillas!) then stick them on a plate. they can then either be filled or you can cover them in cling film and leave them in the fridge for a couple of days - great if you like to eat wraps instead of sandwiches!


**the website i got this from also included baking powder but i had none and didn't notice a difference!


-------------------

now you've got your tortillas, you can fill 'em. these are three fillings i've had in my tortillas over the last couple of days - 2 chicken-y numbers for tea (with homemade fries and spicy rice, respectively) and one for veggie lunch option.

chicken and humous - fills two tortillas (or one large one)

one small chicken breast, cut into strips & marinated
half a tomato, thinly sliced
1/2 a small white onion, sliced
1/3 red pepper, sliced
1/3 yellow pepper, sliced
a big dollop of humous
1 heaped tablespoon natural yoghurt
mint

for the marinade: olive oil, plus squirts and splashes of ketchup, honey, worcester sauce and fish sauce, and some chilli powder, basil, salt and pepper.

- slice your chicken and stick it in the marinade (i did this while my tortilla dough was resting), then put it in the fridge.

- the mint yoghurt is THE EASIEST THING EVER and is great. literally, sprinkle mint into some natural yoghurt. keep tasting it to get to the desired mint-y level and leave to one side...

- fry your chicken in a little olive oil for a minute, then add in the peppers and onions and continue frying until cooked through.

- spread humous on the tortilla - you should keep your fillings to the centre of the tortilla, leaving space at the bottom too! - then lay the sliced tomato on top. if you want to add salad (spinach is a great choice) put this on too, then top it off with your chicken-y mixture. dollop the mint yoghurt on top then fold the bottom up and the sides over each other! (i'm keeping mine together with skewers in the pic...)


chicken and avocado - fills two tortillas (or one large one)


one small chicken breast, cut into strips & marinated
half an avocado, sliced
dollop of cream cheese

relish:
half a tomato, roughly chopped
1/3 large red onion, sliced
2 small mushrooms, roughly chopped
chilli powder
large squirt of ketchup
a little worcester sauce

marinade:
tablespoon natural yoghurt

tablespoon lemon juice
teaspoon honey
big sprinkle of coriander
little sprinkle worcester sauce
pepper
salt

- as before, slice and marinade the chicken.

- for the relish, add the onion and tomato to a little olive oil in a pan and fry for a minute, then add the mushroom and fry for another minute. add the other relish ingredients and keep it simmering until the rest is ready.

- fry the chicken for a few minutes; until cooked through.

- spread the cream cheese as before. add the sliced avocado and the chicken on top of that, then place


the relish on top


and wrap. this was my favourite wrap of the three! the chicken marinade is wonderful.


(leftover relish goes into spicy rice, along with some peas. alternatively you can leave it in the fridge for another time!)


humous, tomato and avocado - fills one tortilla

one big dollop of humous
half a tomato, thinly sliced
1/4 avocado, thinly sliced
a little salad

this is simple - just layer up the ingredients, starting with the humous (i find wraps are best when they go like this: spreadable things/slices of things/chunks of things/sauces&relishes).
add some basil or pepper if you'd like!
this would probably be great with some cheese on top too!

Saturday, 31 July 2010

Testing, Testing: Fruity Beef Curry (& Dessert!)


those who
follow me on twitter might've noticed me post this last night. a tweaked version of this recipe, as posted on the guardian website last week - here are there weights and measurements, and you can of course find my tweaks and method below, as well as the all important taste test...

Preparation time: 5 mins
Cooking time: 40 mins
Number of servings: 4

Nutrition information per serving:
Calories: 455
Sugar: 32g
Fat: 9g
Saturates: 3g
Salt: 1g

Ingredients:
2 onions
400g of lean diced beef
1 tbs of curry powder
1 apple
100g of sultanas
2 tins of chopped tomatoes (400g each)
4 tbs of low fat yoghurt
1 tbs of olive oil
160g of brown rice, uncooked weight
i can't speak for how my tweaks effect the calorie intake and such, but i made 2 small portions (one for tonight!) with:
1 small onion
1 clove of garlic
a portion of beef, with the fat removed, and cut into chunks
half an apple, chopped into chunks
a handful of raisins (for i had no sultanas)
1 tin of chopped tomatoes
3 tablespoons of natural yoghurt

1 heaped teaspoon of garam masala, and a sprinkle of curry powder
a sprinkle of coriander, salt and pepper

--------------

add the rice to boiling water in one pan.
in another* brown the beef in a little olive oil, then leave to one side.
add a little more oil to the pan, and cook the onions and garlic until soft, then add the herbs and spices and fry for another minute or so.
add the beef back into the pan along with the apple, raisins and tomato. let it simmer until the tomato juices reduce, then add the yoghurt.
the rice should be ready now (20 mins, ish), so serve up and enjoy!

i had a mini garlic+coriander naan, too, which went under the grill for a minute or two, so make sure to heat the grill up if you're also having a naan. shop bought, but one day i will get around to making my own naans, as i keep saying about pasta. i have the recipes!

* if you don't already have one, get a non-stick wok. i use it for EVERYTHING - omelettes and pancakes come out perfectly shaped, and you can throw everything into it without fear of the bottom bits getting stuck in stir frys and curries. great for things like shallow fried chips too - again, no sticking (clue's in the title)

this is a wonderful curry - the apple is great, but the raisins were perfectly sweet and soft in the mixture. i don't know if sultanas would have had the same effect, but next time i'll definitely add more raisins than the small handful i added this time.

and for dessert?
well, i had to do something with the other apple half!

sweet fried apples with ice cream:


(serves one!)

thinly slice half an apple.
heat up butter in a frying pan, and add the apple segments.
sprinkle sugar over the apple and fry for a minute or so.
turn the apple over and sprinkle sugar on this side - add more butter if you need to!
when brown on both sides, add to a plate with vanilla ice cream (mine is haagan daas, ofcourse) and drizzle with honey.

they should be sweet and crunchy but soft on the inside, and a great accompaniment to curry (but especially this one!)